Help
When installing or updating the eqMac driver on macOS, you may be prompted to enter your System Administrator password. This is necessary because eqMac needs to place the driver as well as the helper into system directories. The only way for eqMac to do this is to have temporarily raised privileges. By entering your System Administrator password, you authorize eqMac to make these changes to your system, ensuring that the driver and helper are properly installed or updated for eqMac to function effectively. If you prefer to install the eqMac driver and helper manually to the correct directories instead of relying on the application to do it for you, follow these steps:
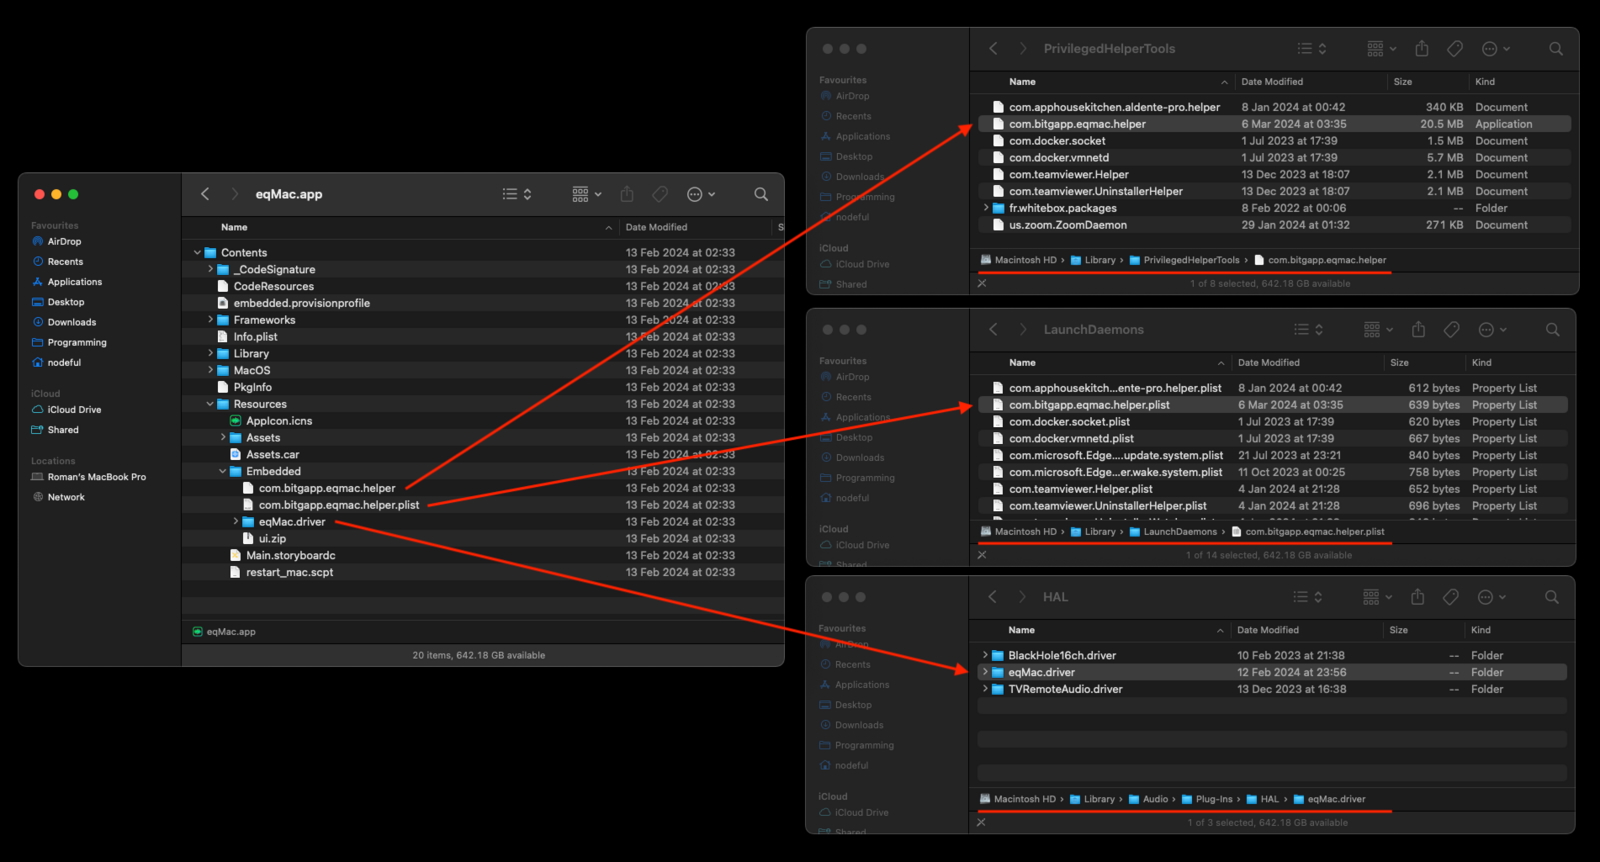
Step 1: Locate the Driver and Helper Files
You can access the eqMac driver and helper files from the following directory within the eqMac application bundle:
/Applications/eqMac.app/Contents/Resources/Embedded/
Step 2: Copy the Driver to the HAL Directory
- Open Finder and navigate to the
/Library/Audio/Plug-Ins/HAL/directory on your macOS system. - Locate the eqMac driver file (usually named
eqMac.driver) within the directory mentioned above. - Copy the eqMac driver file to the
/Library/Audio/Plug-Ins/HAL/directory.
Step 3: Copy the Helper to the PrivilegedHelperTools Directory
- Open Finder and navigate to the
/Library/PrivilegedHelperTools/directory on your macOS system. - Locate the eqMac helper file (usually named
com.bitgapp.eqmac.helper) within the directory mentioned above. - Copy the eqMac helper file to the
/Library/PrivilegedHelperTools/directory.
Step 4: Copy the LaunchDaemon plist file to the LaunchDaemons Directory
- Open Finder and navigate to the
/Library/LaunchDaemons/directory on your macOS system. - Locate the eqMac LaunchDaemon plist file (usually named
com.bitgapp.eqmac.helper.plist) within the directory mentioned above. - Copy the eqMac LaunchDaemon plist file to the
/Library/LaunchDaemons/directory.
Step 5: Set Permissions (Optional)
To ensure that the driver and helper have the correct permissions set, you may need to adjust the permissions after copying the files. Right-click on each file, select "Get Info", and make sure the permissions are set to match those of other files in the respective directories.
Step 6: Restart Your Mac
After copying the driver and helper files to their respective directories, restart your Mac to ensure that the changes take effect.
Step 7: Verify Installation
Once your Mac has restarted, verify that the eqMac driver and helper are installed and functioning correctly. You can do this by launching eqMac and checking for any errors or warnings related to the driver and helper.
By following these steps, you can manually install the eqMac driver and helper to the correct directories on your macOS system if you prefer not to rely on the application to perform this task automatically.